


Post-construction cleaning is the specialized process of removing construction debris, dust, and residues from a newly built or renovated space to make it safe and ready for occupancy. In 2018, construction and demolition activities generated approximately 600 million U.S. short tons of debris, according to the U.S. Environmental Protection Agency's construction and demolition materials data.
You've just finished a kitchen renovation. The cabinets look excellent, the counters are installed, and you're ready to put groceries away. Then you wipe the island and find a gray film on the cloth. There's dust on the cabinet tops, inside drawers, around the vents, and along the floor edges. The work may be finished, but the home isn't ready for normal living yet.
Why Your Renovated Home Needs More Than a Quick Sweep
Regular housekeeping handles the residue of daily life. Post-construction cleaning handles the residue of building work, including drywall dust, plaster, sawdust, paint specks, adhesive, grout haze, packaging, labels, and small debris. Those materials settle on surfaces ordinary cleaning often overlooks, such as trim, cabinet interiors, light fixtures, window tracks, door hardware, vents, and flooring edges.
A quick sweep can make a room look better while moving fine particles into the air. A standard vacuum can collect visible crumbs and larger debris, but it may not be suitable for fine renovation dust, particularly where silica or lead contamination could be involved. The job requires controlled removal, surface-specific cleaning, and an inspection that checks more than what looks clean from the doorway.

Construction residue behaves differently
The EPA's 2018 breakdown shows that demolition produced more than 90% of total construction and demolition debris, while construction produced less than 10% (EPA material data). That distinction matters at home. A renovation can create a mixture of loose packaging, cutoffs, settled dust, adhesive residue, and particles produced by sanding or drilling, even when no major demolition occurred.
Concrete accounted for 67.5% of C&D debris, asphalt concrete for 17.8%, wood products for 6.8%, and all other materials combined for 7.9%, according to the same EPA dataset. A homeowner may not see those material categories as a pile in the kitchen, but cutting masonry, installing wood, or removing old finishes can leave different residues that need different handling.
Practical rule: If a white cloth picks up powder from a supposedly finished ledge, the room needs more than a visual sweep.
Air movement also deserves attention. Dust can collect around supply registers, return grilles, and accessible ventilation-adjacent surfaces. Homeowners who want a broader explanation of how ductwork can hold and redistribute particles can consult the Covenant Aire Solutions guide to duct cleaning. For a hands-on overview of removing renovation residue from household surfaces, see this construction dust cleaning guide.
Understanding the Staged Remediation Process
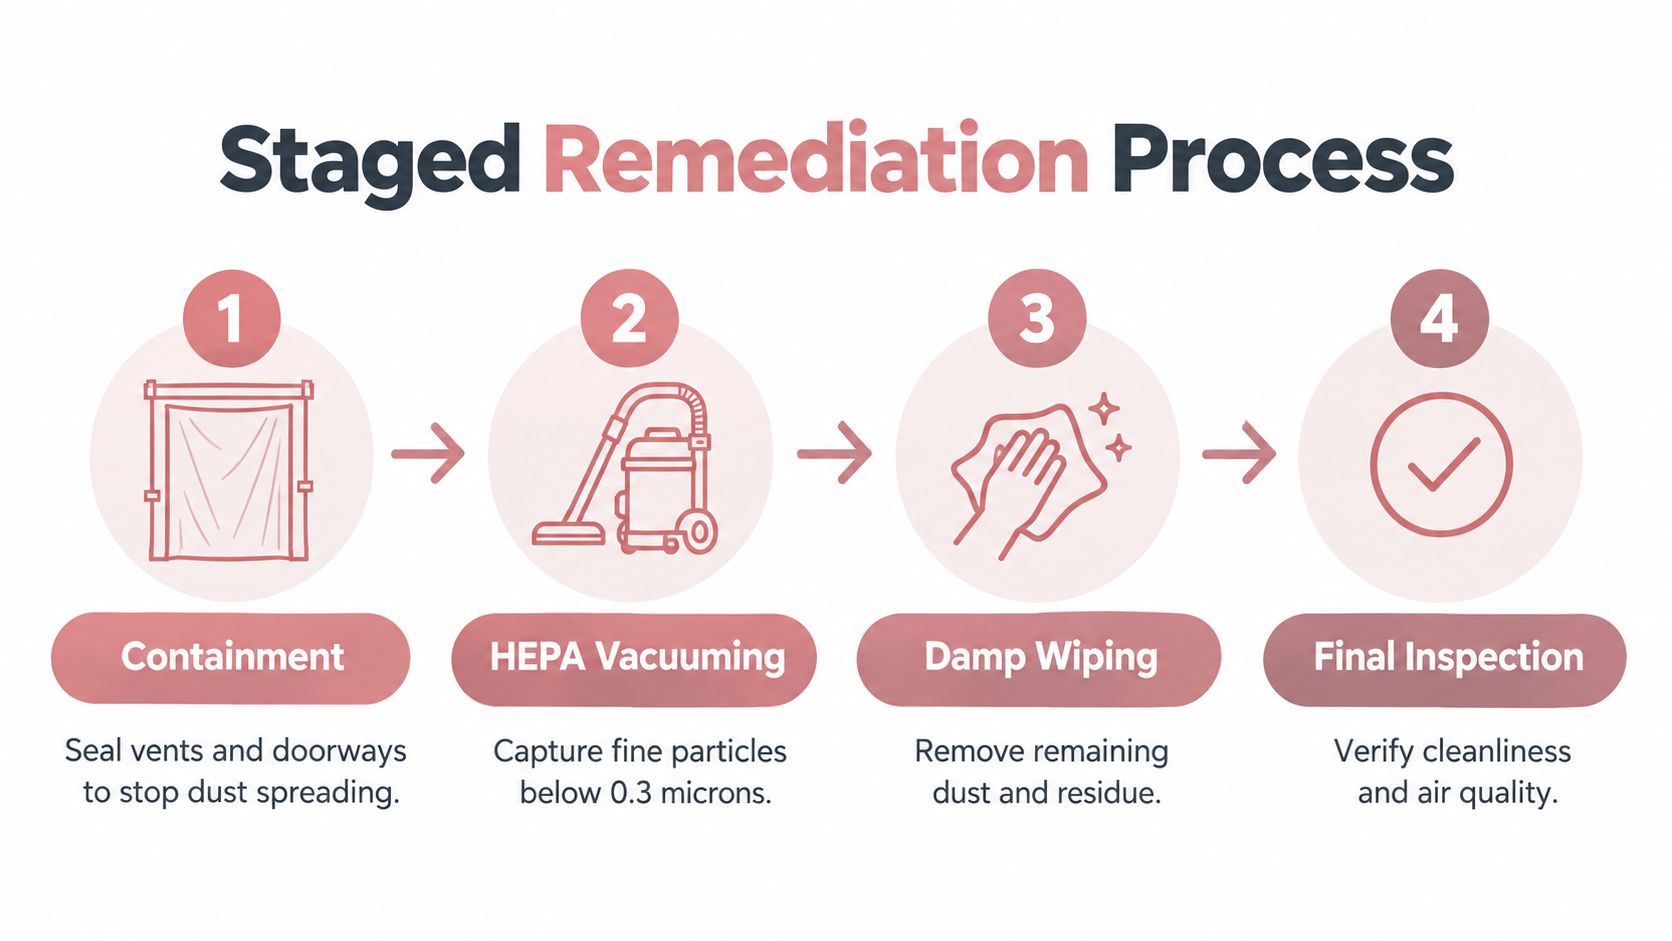
Post-construction cleaning works best as a staged remediation process, not as one aggressive visit at the end. Each stage prevents the next one from undoing the previous work.
The sequence usually begins by isolating the work area or protecting clean rooms. Larger debris is removed before fine cleaning starts. Crews then vacuum from high surfaces downward, damp-wipe the remaining film, clean floors last, and inspect the home after dust has had time to settle.
Why the order matters
OSHA guidance for construction silica exposure favors wet methods and HEPA-filtered vacuuming, and restricts dry sweeping or compressed air when those methods could increase respirable crystalline-silica exposure (OSHA silica guidance). Silica-containing materials include concrete, mortar, brick, and stone when they're cut, drilled, ground, or demolished.
A practical sequence looks like this:
- Contain the work zone. Seal doorways where appropriate, cover or protect HVAC grilles, and use ventilation that moves contaminated air away from clean areas.
- Remove bulk waste. Collect packaging, wood pieces, drywall scraps, and larger debris before vacuuming fine dust.
- Vacuum high to low. Use suitable HEPA equipment on ledges, trim, cabinet tops, fixtures, and other raised surfaces before floors.
- Damp-wipe residue. Use clean microfiber cloths and suitable solutions to capture the film left after vacuuming.
- Finish with floors. Vacuum and damp-mop flooring after upper surfaces are complete.
- Inspect after settling. Check representative surfaces again, especially horizontal ledges, corners, vents, and floor edges.
Dry sweeping fails because it can suspend dust and send it into a room that was already cleaned. Compressed air creates the same problem unless effective capture ventilation is in place or no practical alternative exists. A detailed explanation of the service scope and phased work appears in this construction cleanup service resource.
Ordinary residue and regulated hazards must stay separate. Suspected asbestos, lead paint, or mold shouldn't be disturbed by a general cleaning crew. Those conditions require qualified assessment or remediation.
Room-by-Room Cleaning Checklist for Post-Construction Sites
A whole-home checklist prevents the common mistake of cleaning only the surfaces that catch the eye. Dust settles differently in each room, and new fixtures often arrive with labels, protective film, adhesive, and fine residue that standard housekeeping doesn't address.
Kitchen
Start high and work toward the floor. Wipe cabinet tops, cabinet interiors, shelves, hinges, drawer tracks, appliance exteriors, backsplash surfaces, countertops, and accessible areas beneath appliances. Remove labels and adhesive carefully, using a product compatible with the finish rather than scraping a new surface with a metal blade.
Check the range hood, light fixtures, toe-kicks, and the narrow gap where the counter meets the wall. For example, a cabinet can look spotless from the front while drywall dust remains inside the top shelf and along the drawer runners.
Bathroom
Remove grout haze from tile using a method approved for that tile and grout. Clean vanity interiors, mirrors, exhaust fan covers, plumbing fixtures, shower hardware, baseboards, and floor edges. Polish chrome only after abrasive dust has been removed, because rubbing dry grit across a fixture can create fine scratches.
Make sure drains are free of construction debris and that protective film hasn't been left on newly installed fittings.
Living areas and bedrooms
Living rooms need detailed attention around window sills, baseboards, door tracks, switch plates, light fixtures, and vent covers. If a vent cover can be removed safely, clean both the cover and the accessible surrounding area, then coordinate deeper HVAC work with the contractor or an HVAC specialist.
Bedrooms commonly hide dust along floor edges, behind doors, inside closets, on shelving, and around ceiling fixtures. A practical example is a newly installed bedroom floor that looks clean in the center but still has a powdery line where the flooring meets the baseboard. A documented deep cleaning checklist helps keep those overlooked areas on the scope.
DIY Versus Hiring Professionals, Making the Right Choice
DIY cleaning can make sense after a small project that produced limited dust, such as replacing a vanity or installing a single fixture. The homeowner still needs a suitable HEPA vacuum, clean microfiber cloths, damp-cleaning supplies, protective equipment, and enough time to repeat the inspection after dust settles.
Professional help becomes more appropriate when the project involved drywall sanding, concrete cutting, masonry work, extensive demolition, or an older home with possible lead-based paint. The decision isn't based only on square footage. It depends on the materials disturbed, the amount of fine dust, the condition of finished surfaces, and who may occupy the home.

A practical comparison
| DIY cleaning | Professional cleaning |
|---|---|
| Works for contained, low-dust projects | Suits larger renovations and widespread residue |
| Gives the homeowner direct control | Brings staged procedures and specialized equipment |
| Requires the right HEPA equipment and patience | Can provide a documented room-by-room scope |
| May not address hazardous-material concerns | Can identify when work exceeds general cleaning |
| Visual inspection is often the main check | Inspection can include representative surface checks |
The clearance standard depends on the materials disturbed and the building's age, not merely on whether a room looks clean. EPA lead-safe renovation guidance describes wet disposable cloth verification on dust-collection surfaces and cites action thresholds of 5 micrograms per square foot on floors and 40 micrograms per square foot on window sills in one EPA procedure (EPA lead-safe cleaning guidance).
A clean-looking room can still need a controlled inspection when painted surfaces, masonry dust, or vulnerable occupants are involved.
For homes with children, pets, asthma concerns, or chemical sensitivities, don't treat a visual pass as proof of readiness. Compare providers by asking what equipment they use, how they contain dust, which surfaces they include, and whether they'll flag lead, asbestos, or mold concerns. This guide to choosing a cleaning company can help structure that conversation.
Pricing Factors and Eco-Friendly Cleaning Options
Post-construction cleaning quotes vary because two homes with similar layouts can have very different residue. A light bathroom renovation may need careful fixture and floor-edge cleaning, while a whole-home remodel with drywall sanding can require containment, repeated passes, detailed cabinetry work, and additional inspection.
Key pricing factors include:
- Project scope: A single-room renovation generally requires less labor than a whole-home build or remodel.
- Residue type: Adhesive, grout haze, paint specks, drywall dust, and fine masonry particles each affect product choice and labor.
- Surface sensitivity: New stone, finished wood, glass, and specialty flooring may need slower, less abrasive methods.
- Access and clutter: Furniture, stored materials, pets, and crowded rooms increase setup and handling time.
- Service preferences: Some households request biodegradable solutions or add-ons for appliances, windows, garages, or basements.
Aquastar Cleaning Services, LLC offers customizable post-construction cleanup plans for homes in Kennesaw and North Atlanta, with pricing adjusted to home size, pets, product preferences, and clutter levels. Homeowners can also review this post-construction cleaning cost guide before requesting a quote.
What eco-friendly products can and can't do
Biodegradable products can be a sensible choice for suitable residue, particularly for households with children or pets. They may help reduce exposure to aggressive cleaning chemicals, but a green label doesn't neutralize hazardous dust.
Construction residue may include respirable silica, lead, asbestos fibers, formaldehyde, mold, or other compounds. Wet wiping and mopping can capture settled dust, but they don't make an unsafe material safe. Source control, sealed barriers, ventilation, HEPA filtration, and correct protective practices matter more than product branding.
For example, a gentle cleaner may be appropriate for adhesive residue on a finished cabinet after the material has been assessed. It isn't an adequate response to suspected lead dust or asbestos-containing debris. Stop work and use qualified specialists when the material presents a regulated hazard.
Safety Considerations and Proper Waste Disposal
Construction cleanup needs a sorting decision before it needs a trash bag. Clean drywall scraps, uncontaminated wood offcuts, ordinary masonry fragments, packaging, and similar material may enter an approved construction and demolition waste stream. Items contaminated with regulated hazardous substances require separate evaluation and disposal.
The EPA explains that C&D landfills may accept construction, renovation, demolition, excavation, and site-clearance material, but they don't receive hazardous waste unless the facility is permitted and meets applicable standards (EPA C&D landfill guidance). Rules for solid-waste disposal are overseen by states, so local requirements and permitted facilities must be checked.
Sort before haul-away
Keep paint, solvents, chemical containers, suspected asbestos-containing material, and visibly contaminated debris aside. Don't place every item in one bin just because it came from a renovation.
A sensible handoff includes:
- Contractor materials: Confirm who removes leftover building materials, tools, packaging, and trade waste.
- Ordinary C&D debris: Separate clean, recoverable, and approved disposal materials.
- Potential hazards: Stop handling and arrange qualified evaluation for suspected lead, asbestos, mold, or chemical contamination.
- Hauling support: If the volume exceeds normal cleaning disposal, a service such as Reworx Recycling junk removal may help coordinate removal, subject to the material's permitted disposal route.
Lead concerns require extra care in older housing. CDC guidance says remodelers should use HEPA dust-collection systems, and sanding, grinding, or power planing painted surfaces is prohibited unless the tool has a dust-collection shroud connected to a HEPA-rated vacuum filter (CDC lead-safe remodeling guidance). A standard household vacuum and dry brush aren't suitable substitutes.
The timing matters, too. Don't perform the final occupancy clean while trades are still cutting, sanding, or painting in the same rooms. Coordinate debris sorting, hazard review, HVAC protection, and the final cleaning sequence before residents return.
Timing Your Post-Construction Cleanup for Best Results
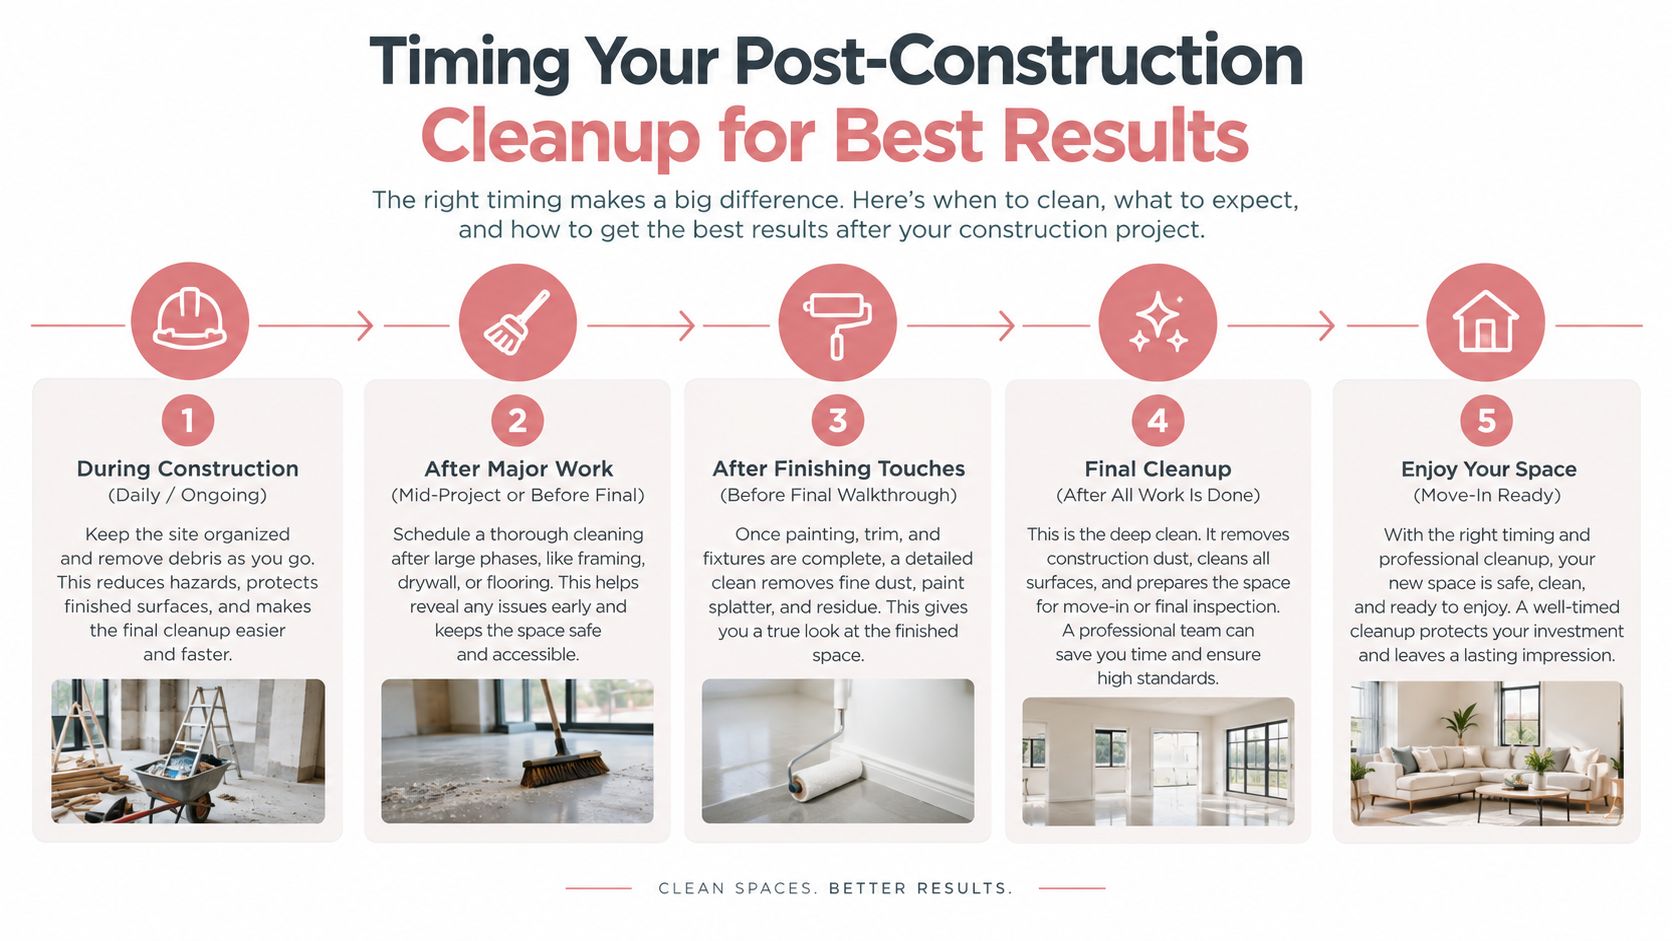
The common assumption is that cleaning should happen once, after the contractor leaves. That approach works poorly when dust-generating work continues, when HVAC equipment is uncovered too early, or when a punch-list repair creates fresh residue after the supposed final clean.
Occupied homes need a different plan. Massachusetts guidance recommends daily cleaning of occupied areas during dust-generating work, pairing HEPA vacuuming with wet cleaning. That approach keeps active work from turning the rest of the home into a secondary construction zone.
Use a three-point schedule
Rough cleanup follows the completion of major trades. Larger debris, packaging, protective film, and loose materials leave first.
Detailed final cleaning happens after the heavier dust has settled and contractors have stopped creating new residue. Crews address ledges, fixtures, cabinets, floors, glass, trim, and ventilation-adjacent surfaces.
Post-cleaning inspection takes place before furniture, children, pets, or residents return. Check for powdery film, dust transfer to a clean white cloth, debris in corners, residue on sills, and dust movement from HVAC components.
For example, a homeowner may clean the kitchen on Friday, then have an electrician drill into the backsplash on Saturday. The original cleaning no longer represents the room's final condition. Scheduling the detailed clean after trade work ends prevents that rework.
Before choosing a disposal arrangement, homeowners can compare waste management solutions and confirm which materials belong in approved C&D streams. Keep the contractor, cleaner, and disposal provider aligned on responsibilities.
The sequence also helps with occupant protection. Vulnerable residents shouldn't return just because counters shine. Confirm that work zones are clear, ventilation components aren't redistributing renovation dust, waste is removed through the correct route, and the final room-by-room checklist is complete.
Aquastar Cleaning Services, LLC provides residential post-construction cleanup, deep cleaning, move-in and move-out cleaning, and room-specific services for homes in Kennesaw and North Atlanta. Visit Aquastar Cleaning Services, LLC to request a plan that addresses construction dust, debris, fine residue, and your home's occupancy checklist.