


You open the oven to make dinner and find a dark, sticky patch beneath the racks. A damp cloth takes away the crumbs, but the brown crust stays put, and you're wondering whether to scrub harder, reach for oven cleaner, or press the self-clean button.
The safest way to remove baked-on grease is to match the cleaning method to the oven's finish and the severity of the buildup. Start by checking the appliance instructions, then use the least aggressive approved method. An enamel oven floor, a door gasket, and a catalytic liner shouldn't all receive the same treatment.
Why Baked On Grease Is So Hard to Remove
Consider the aftermath of a roast that spilled fat onto the oven floor. Once the appliance cools, some grease wipes away, but a darker outline remains. That stubborn patch needs more than a stronger grip on the sponge.
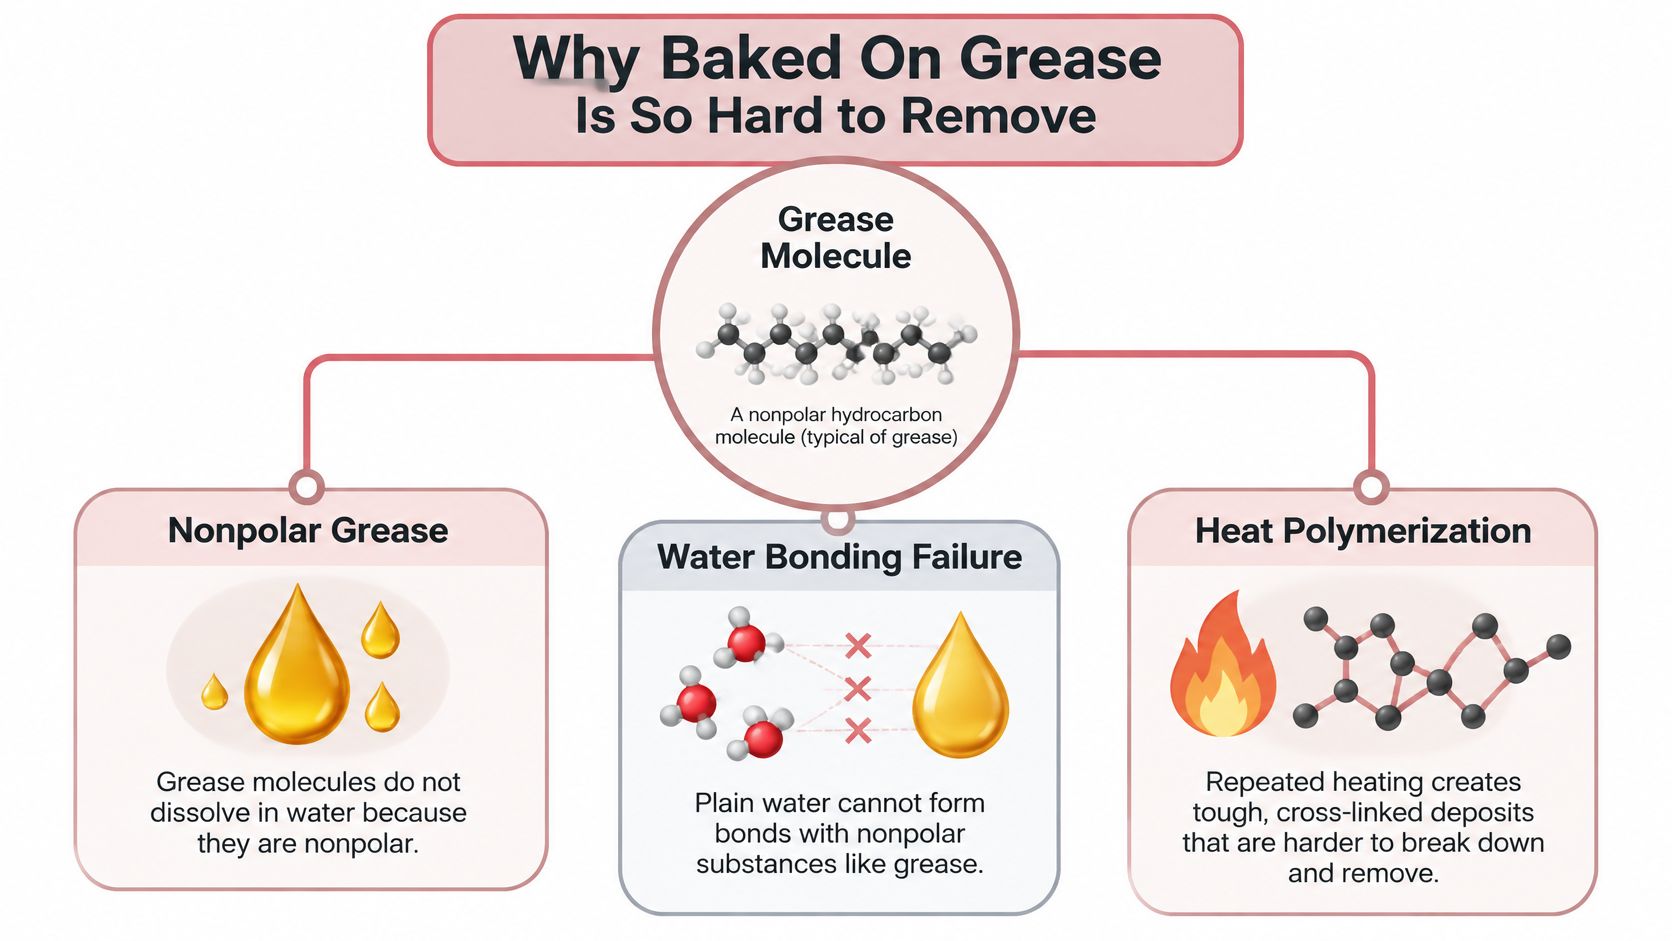
Grease is nonpolar, so plain water doesn't readily combine with it. Detergents contain surfactants, which help water interact with grease and suspend loosened soil so you can wipe it away. For heavily burnt deposits, the challenge also includes getting the cleaning solution to wet the tightly attached residue.
Why chemistry matters more than pressure
A technical review of alkaline cleaning formulations in SOFW Journal identifies pH above 11 as a target for grease emulsification and soil dispersion, while emphasizing wetting and sufficient caustic alkalinity for charred oil. That's formulation guidance, not a recommendation to mix a stronger chemical solution at home.
The practical lesson is simpler: use an appropriate cleaner, give it time to work, and remove the softened material gently. Mild baking soda paste and a purpose-designed alkaline oven cleaner aren't interchangeable in strength, even though both belong to the alkaline side of cleaning.
The diagram illustrates why a quick water-only wipe can leave the hardest deposits behind.
Read the deposit before choosing the tool
Look at what's on the surface rather than treating every brown mark as the same cleaning problem.
- Loose crumbs and flakes: Remove these before wet cleaning so they don't become dirty slurry.
- Sticky grease film: An approved detergent and non-scratch tool may be enough.
- Hard, blackened patches: Plan for softening, careful removal, and possibly a stronger approved product.
For example, if a nylon pad slides over a hard patch without lifting anything, don't immediately switch to metal. Reassess the cleaner, contact time, and surface restrictions first.
Practical rule: When the residue won't move, change the cleaning approach before increasing the force.
Burnt cookware presents a related cleaning challenge, but the permitted tools can differ. Keep cleaning the bottoms of pans separate from your oven routine rather than assuming a cookware technique is safe on coated oven walls.
Safety First Before You Start Cleaning
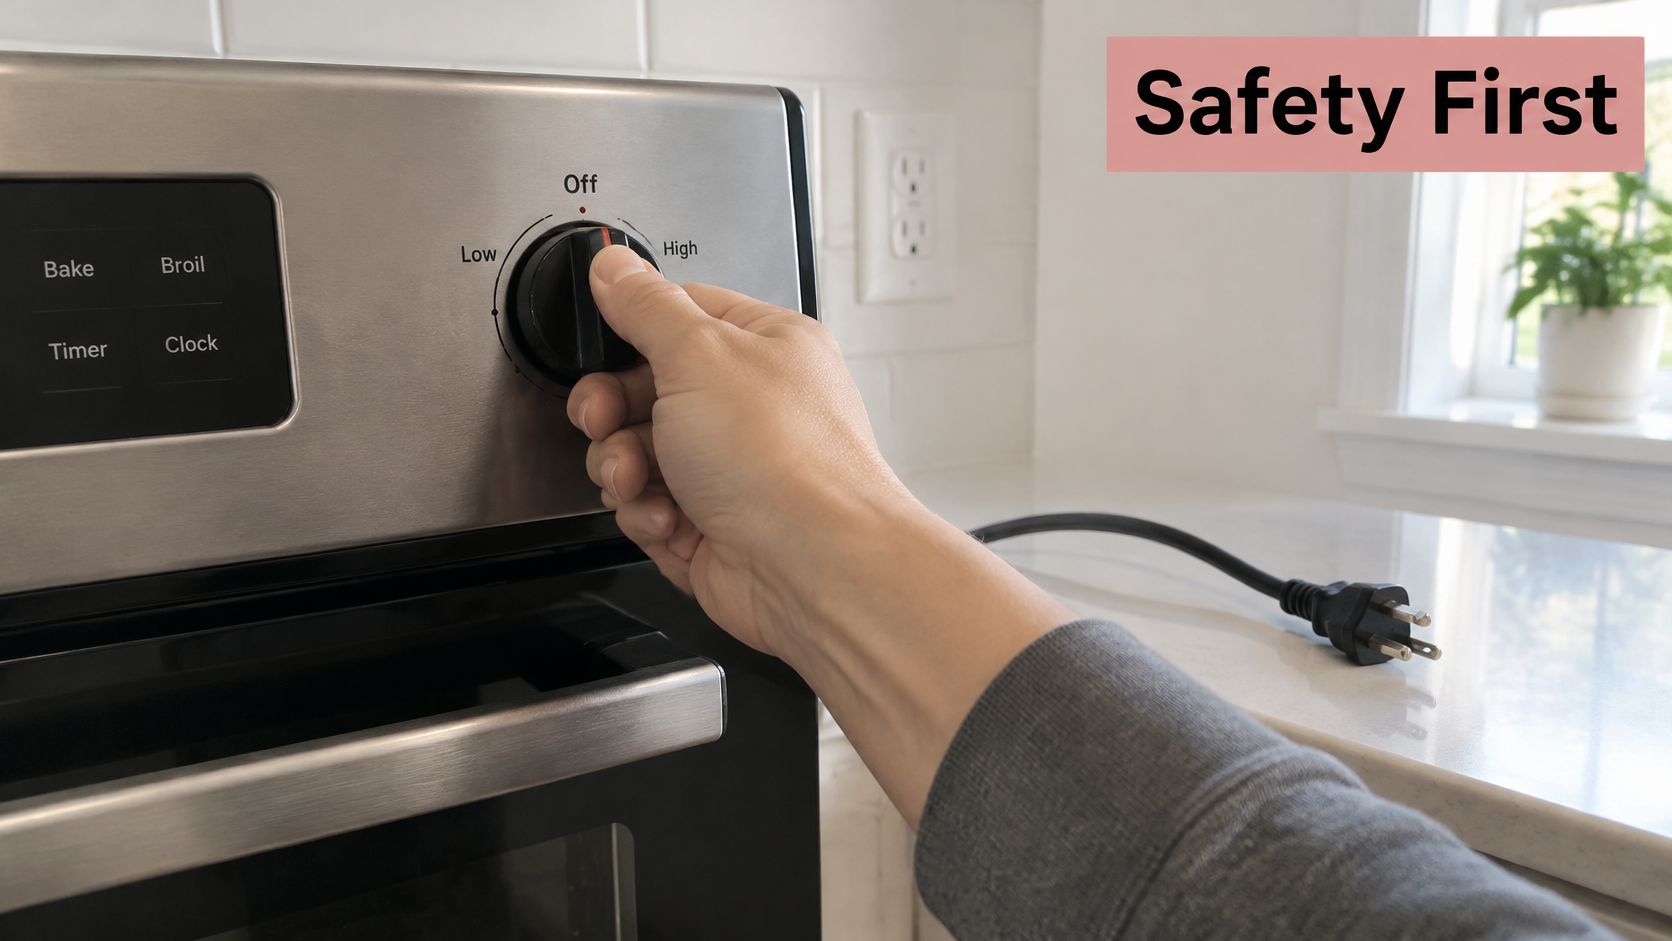
Switch the oven off and wait until every surface is completely cool. Disconnect electrical power where applicable and according to the appliance instructions. Don't reach around hot elements or start applying cleaner because the door glass feels cool.
GE's oven safety guidance recommends rubber gloves during cleaning and warns that accumulated grease can ignite. Cooling and preparation aren't optional preliminaries, they're part of the cleaning job.
Start with the controls before touching anything inside the cavity.
Prepare the workspace
Gather the tools before putting on gloves: paper towels, a non-metallic brush, a nylon pad approved for the finish, clean cloths, and your chosen cleaner. Keep the product instructions available rather than relying on memory.
- Clear the cavity: Remove racks, trays, and loose accessories as the manual directs.
- Lift loose material: Pick up cooled food pieces and wipe accessible pooled grease with paper towels.
- Protect the room: Keep children and pets away from the open appliance and cleaning supplies.
- Check ventilation: Arrange airflow before using products that require it, not after an odor develops.
For example, after a roasting tray overflows, don't smear the entire spill around with a wet sponge. Once everything is cool, lift the loose material first, then work on the attached residue. This gives you a clearer view of the surface you're cleaning.
A lower-hazard product still needs sensible handling. These eco-friendly cleaning tips can help you plan household cleaning without treating “gentle” as permission to ignore labels.
If grease is burning, stop cleaning
Never pour water onto an active grease fire. If flames are inside the oven, keep the door closed and turn the appliance off if you can do so safely. Don't open the door to inspect the fire or attempt to wipe anything away.
GE's guidance identifies an appropriate multipurpose dry-chemical or foam extinguisher as an option. Only attempt extinguisher use if you can do so safely and have a clear escape route; otherwise, leave and call emergency services.
A greasy oven is a cleaning task. An oven with active flames is an emergency.
The Baking Soda Paste Method for Standard Ovens
A splash of roast fat from Sunday's dinner is a different job than a year of baked-on film, and baking soda paste handles the first far better than the second. On a standard enamel interior whose manual permits it, the paste gives you control over exactly where the mixture sits. Heavy deposits take patience and often a second round.
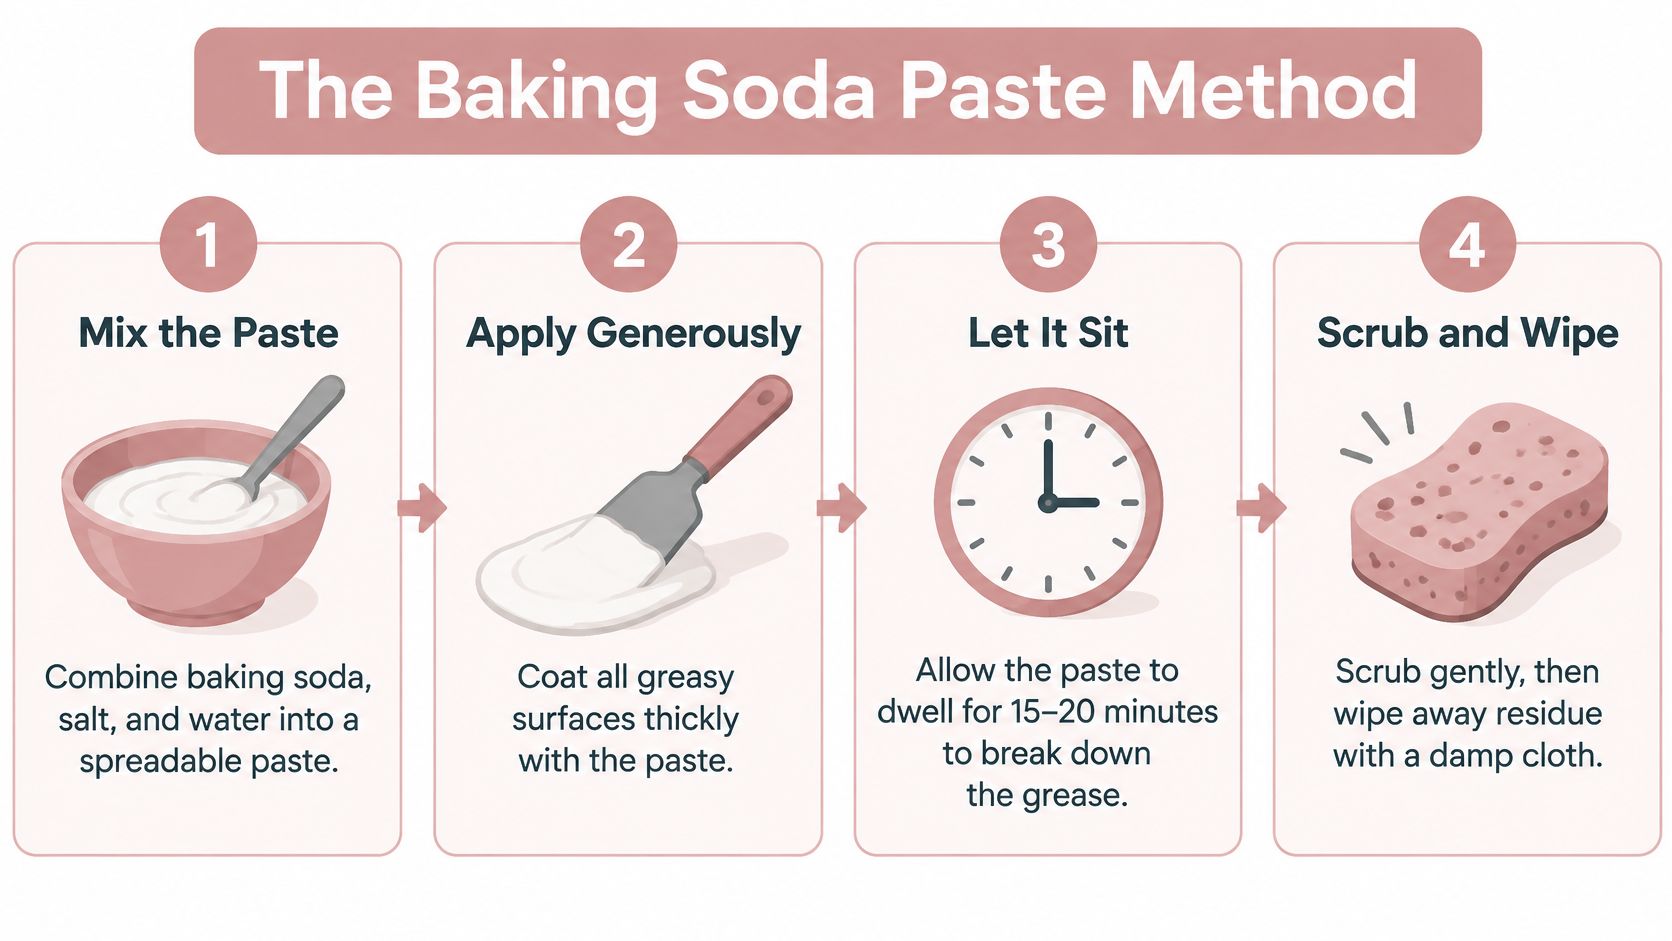
The University of Kentucky Extension household cleaning guide recommends a paste of baking soda, salt, and water, with a five-minute dwell for lighter deposits. Stubborn buildup may need several hours or overnight before it softens.
Where the paste goes, and where it never goes
Mix the baking soda and salt with enough water to make a spreadable paste that clings instead of running. Brush loose carbon away with a non-metallic brush, then coat only the greasy patches on approved enamel.
Some parts of the cavity stay dry no matter how greasy they look:
- Heating elements and any visible wiring
- Vents and openings where paste could migrate inside
- The door seal, which paste can stiffen or degrade
"Standard oven" describes the appliance category. It says nothing about whether every surface inside is enamel. Sidewalls with a catalytic or continuous-clean liner work differently, and paste can clog the coating those liners depend on. If you can't identify a surface, leave it alone until the manual confirms what it is.
Loosen, lift, and check what's left
After the dwell, work the deposit with a nylon pad under light, controlled pressure. Lift dirty paste away as it releases rather than rubbing it across clean enamel. Metal scrapers scratch coated interiors, and a scratch gives corrosion a place to start. If a patch stays hard, reapply paste instead of digging under its edge.
Take a roast-fat spill on the oven floor. Paste goes on the attached residue after the loose grease comes up, the edge gets a gentle test once the dwell ends, and whatever releases gets wiped before you reassess the rest.
Rinse with clean, damp cloths until no gritty paste or greasy film remains, then inspect the corners under bright light before the oven goes back into service. When a deposit survives a second application and the only tools left are abrasive ones, a professional oven clean costs less than a damaged liner. For surfaces beyond the oven, this guide to baking soda stain removal covers other applications, with oven-specific restrictions still in force here.
This demonstration shows the process in action.
Self-Cleaning Ovens and When to Use the Cycle
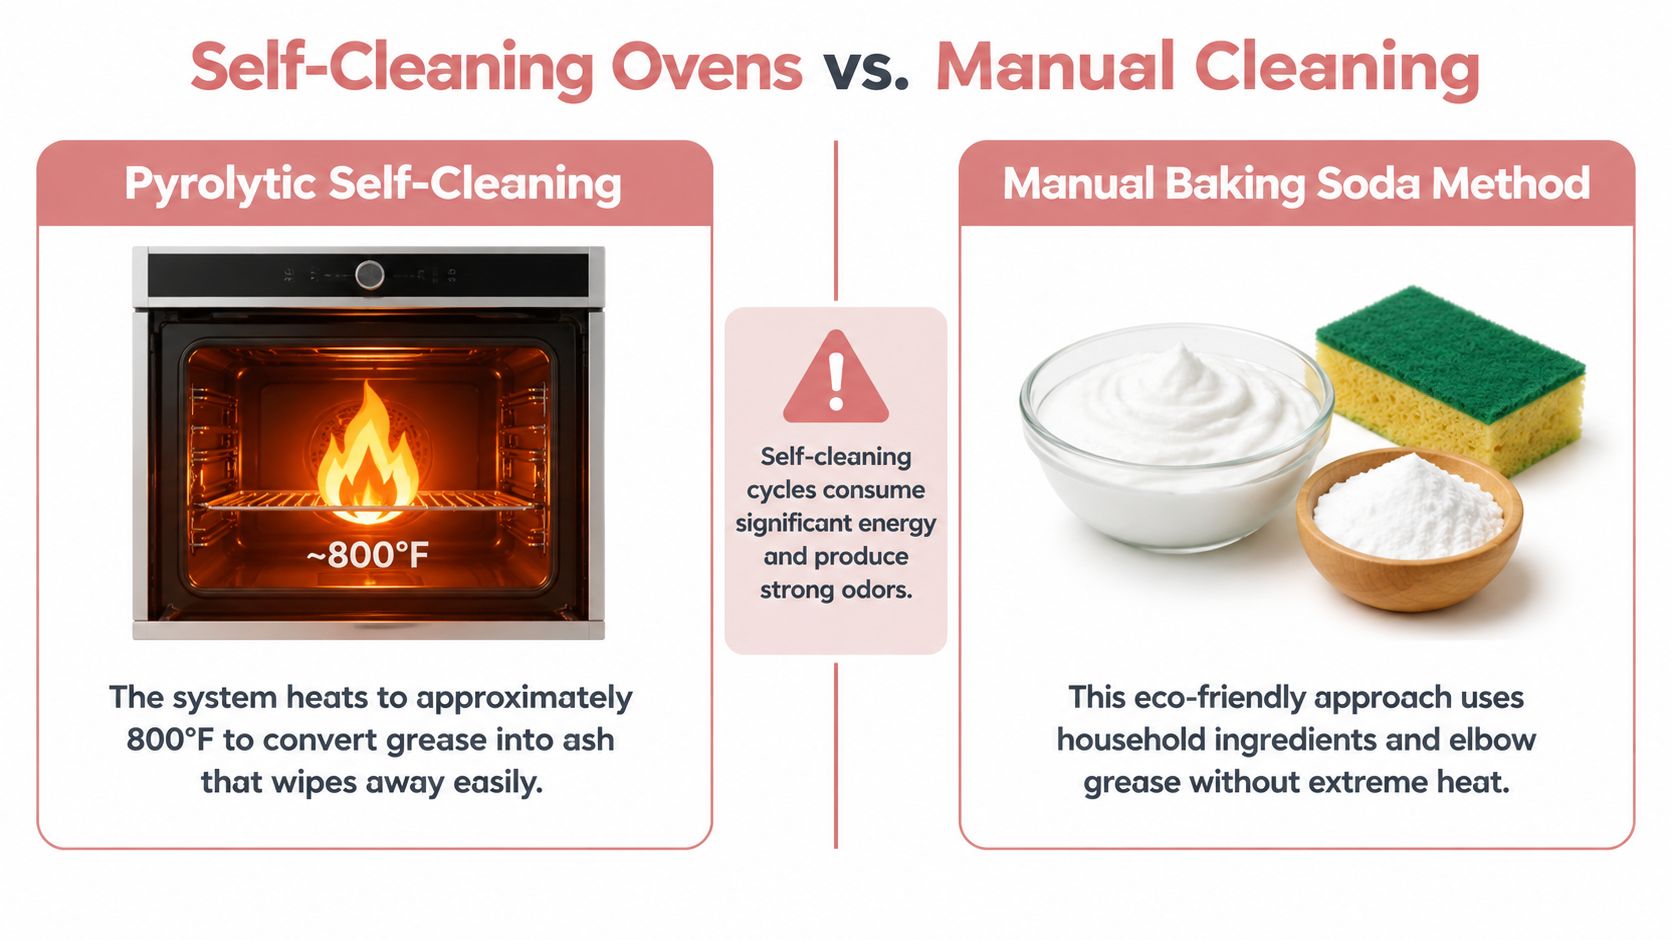
The self-clean button isn't a faster version of wiping out the oven. Pyrolytic cleaning uses extreme heat to turn organic residue into ash, whereas manual cleaning aims to loosen grease so you can remove it.
CHOICE's guidance on pyrolytic ovens describes operating temperatures of approximately 400–500°C, or 752–932°F. That difference explains why the decision involves household conditions as well as the appearance of the oven.
Compare the work and the trade-offs
| Consideration | Manual cleaning | Pyrolytic self-cleaning |
|---|---|---|
| Main approach | Soften and wipe away deposits | Convert remaining organic residue into ash |
| Hands-on work | Application, gentle scrubbing, repeated wiping | Preparation and ash removal after cooling |
| Household concern | Product exposure and thorough residue removal | Very hot surfaces, odors, and ventilation |
| Appropriate starting point | Light or moderate grease on approved surfaces | A compatible oven prepared exactly as its manual requires |
For example, a few greasy splashes after cooking don't automatically justify a high-temperature cycle. Targeted manual cleaning may be the more manageable choice. Conversely, a compatible oven with remaining deposits may be suitable for pyrolytic cleaning once the required preparation is complete.
The comparison below highlights the different approaches.
Decide whether the household can accommodate it
During a pyrolytic cycle, the exterior can become unusually hot and substantial residue can produce strong odors. Provide ventilation, keep children away, and remove pets sensitive to fumes from the area. A cycle that's approved for the appliance may still be inconvenient or unsuitable for the household at that moment.
Remove loose food and address heavy deposits before starting, following the manual's preparation instructions. Don't use the cycle as a disposal method for pooled fat or large food pieces. Remove racks and combustible items as directed, and keep vents clear.
Choose self-cleaning because the model and household conditions suit it, not because the oven looks too dirty to touch.
A renter who doesn't know the appliance's history should locate the model instructions before pressing the button. If the door seal looks damaged or the controls behave unpredictably, have the appliance assessed instead of testing its cleaning cycle.
After the cycle, follow the manual's cooling and ash-removal directions. Don't improvise by combining chemical cleaners with high heat.
Using Commercial Oven Cleaners Safely
A weekend cleaner sprays foaming oven cleaner across the whole cavity, element cover included, and walks away overnight because the label says the foam keeps working. That one session can pit aluminum trim, degrade a door gasket, and leave chemical film where heat will cook it later. Caustic cleaner earns its place on carbonized grease that survived baking soda paste and repeated mild passes. On anything less severe, the chemical risk outweighs the labor saved.
GE's cleaning instructions permit oven cleaner when necessary, require following package directions, and warn against spraying electrical controls or switches because it can cause a short circuit. That permission covers that appliance family. A different model with a catalytic liner, aluminum components, or a worn seal may prohibit chemical cleaner outright, so the manual's surface list comes before the can.
Know what the can contains and where it may land
Many heavy-duty formulas rely on sodium hydroxide, commonly called lye. An oven and degreaser safety data sheet hosted by the EPA classifies the product as causing skin corrosion and serious eye damage and warns against breathing vapors or mists.
Start with a cool oven, chemical-resistant gloves and splash goggles matched to the product, and airflow through the room. Apply only where both the label and the appliance manual allow it, keeping the spray off heating elements, fans, aluminum, seals, and electrical parts. Use the labeled amount and dwell time exactly. Doubling either raises exposure and surface damage without a proven gain in grease removal.
Never combine oven cleaner with vinegar, ammonia, bleach, or another product. Adding a second chemical to strengthen the first changes the hazard, not the result.
Take the cleaner off as thoroughly as the grease
A thick carbon patch on approved enamel can justify a labeled treatment after a gentler method fails. That approval stops at the enamel, so the adjacent fan cover and trim stay untreated.
Wipe with several water-dampened cloths until no residue remains, following the label's rinsing directions. Professional crews should log the product, dilution, dwell time, ventilation, protective equipment, and the final rinse inspection. For everyday product-handling habits outside the oven, Fillaree's How to Use All Purpose Cleaner Safely reinforces the same glove-and-label discipline. An all-purpose spray still isn't automatically cleared for an oven interior, so the manual decides either way.
Dealing with Stubborn Residue, Smoke, and Fumes
A customer calls after a self-clean cycle: the oven looks spotless, but the first tray of roasted vegetables fills the kitchen with bitter smoke. The cause is usually residue, either grease the heat couldn't fully reduce or a cleaner film that was never wiped away. Reaching for a stronger chemical at that point is how enamel gets damaged.
First, identify what you're looking at. On standard enamel, a dark patch that survives gentle scrubbing is typically carbonized soil and can take another approved round of treatment. On a catalytic liner, that same patch may be the liner itself, and scrubbing it strips the grease-absorbing coating. If you can't tell attached soil from a damaged coating or an unfamiliar liner, stop. A cleaning service can assess removable grease; an appliance technician should assess suspected component damage.
Smoke and irritating fumes change the question from "how do I clean this" to "is this oven safe to run." The Alabama Department of Public Health's oven-cleaning warning explains that incomplete wiping can leave cleaner residue that smokes when heated, and exposure may cause coughing, chest pain, or shortness of breath.
Treat symptoms as stop signals
A chemical smell does not prove a product is still working, and smoke does not reliably burn away on its own. Irritation or coughing means stop the task, leave the area, and ventilate if it's safe to do so. Suspected cleaner exposure means contacting poison control for product-specific guidance and keeping the container available. Chest pain or breathing difficulty calls for urgent medical help. Active flames or uncontrolled smoke mean following your fire precautions and contacting emergency services.
Stop signal: Don't keep heating an oven to discover whether an unexplained smell will eventually disappear.
Say a recently cleaned oven starts smoking the moment you begin cooking. Shut it off. Once it cools, review the cleaning and rinsing instructions rather than layering a second product over the first.
Match the call to the problem
Accessible grease you can't comfortably remove is a job for a cleaning service. Smoke that appears to come from a component, abnormal operation, damaged seals, or contamination behind parts you can't reach is a job for an appliance technician.
Households with asthma, sensitive pets, or poor ventilation should plan exposure control before cleaning begins. Keep children and pets out of the work area, including while products and dirty cloths remain accessible. Once the oven is safe to use again, extend the wipe-down to the surrounding surfaces as part of your kitchen-cleaning routine, so leftover residue doesn't spread across the kitchen.
Choosing the Right Method for Your Oven Type
The owner's manual decides what's safe to touch. The cleaner that works on an approved enamel floor may be unsuitable for the gasket, rack finish, glass, catalytic liner, or convection fan.
Samsung's oven-cleaning guidance illustrates why model-specific preparation matters, including removing large food pieces that could cause excessive smoke or flames during self-cleaning. Treat the model number as part of your cleaning equipment.
Make the decision by soil and surface
| What you find | Sensible starting point |
|---|---|
| Light, removable residue | Warm water and a non-scratch tool, if approved |
| Thick, attached grease | Manual removal with an approved mild method first |
| Persistent carbonized deposits | Compatible commercial cleaner or professional assessment |
| A pyrolytic oven needing further cleaning | Self-clean only when the manual permits it and preparation is complete |
| Unknown coating or damaged component | Stop and identify it before treatment |
For a rental oven with no available instructions, ask the landlord or property manager for the model information. Don't assume it's a conventional enamel cavity because it resembles one.
Check each component separately
- Enamel cavity: Use only compatible cleaners and non-damaging tools.
- Door glass: Follow its specific cleaning directions; don't assume cavity instructions cover glass.
- Door gasket: Don't coat, soak, or aggressively scrub it.
- Racks: Check whether their finish permits the chosen cleaner or cleaning cycle.
- Catalytic liners: Identify the liner and follow its dedicated care instructions.
- Elements, wiring, vents, and fan: Keep cleaning mixtures out of these areas unless the manual explicitly directs otherwise.
The same surface-specific caution applies outside the oven. A separate guide to cleaning a glass-top cooktop is more useful than carrying an oven-cleaning technique onto a different finish.
Call a professional when access, chemical exposure, heavy buildup, or uncertainty makes the job uncomfortable. For older or unfamiliar appliances, knowing when not to experiment is part of cleaning safely.
Aquastar Cleaning Services, LLC offers interior oven cleaning as an add-on to residential cleaning for homes in Kennesaw and the North Atlanta area. Visit Aquastar Cleaning Services, LLC to request a quote and discuss your oven's condition, appliance restrictions, and kitchen-cleaning priorities before scheduling.