



The kitchen floor is ceramic tile. The family room beside it is sealed oak. Both look grimy this Saturday morning, and the temptation is to fill one bucket with hot water and a strong squirt of cleaner and work through both rooms in the same hour.
That plan works on the tile and can cost you the oak. Tile shrugs off moisture. Wood doesn't. Most advice online says "mop until clean," which treats a finished floor like a countertop and ignores the two things that decide the result: how much water touches the material, and whether you're cleaning or disinfecting.
Deep cleaning floors is three jobs in one. Pull the loose soil and grease out of the surface, control the moisture that reaches the material, and disinfect only where there's a real reason. Every floor type sets its own rules for all three. What follows is how I'd walk a homeowner through each one, room by room, with the moisture limits that matter and the damage that's hard to undo.
Deep Cleaning Methods by Flooring Type
Take a house where the kitchen is ceramic tile with pale grout and the family room is sealed oak under a rug that slides every time someone walks on it. Same house, same muddy shoes, two completely different sets of rules. Using the tile routine on the oak is the single most expensive mistake a homeowner makes in a weekend of cleaning.
Find your floor in this table before you touch a mop.
| Flooring type | Cleaner and moisture level | Drying or contact-time rule | Avoid |
|---|---|---|---|
| Sealed hardwood | pH-neutral cleaner, damp cloth only | Dry within minutes; no standing water | Steam, soaking, abrasive pads |
| Engineered wood | Low-moisture, label-approved wood cleaner | Wipe dry immediately | Excess water, steam |
| Laminate | Damp mop with laminate-safe cleaner | Dry to touch before walking on it | Standing water, soaked seams |
| Luxury vinyl plank | Vinyl-safe cleaner on a damp mop | Follow label contact time if disinfecting | Harsh abrasives, oil-based soaps |
| Ceramic or porcelain tile | Hard-surface cleaner, then labeled disinfectant if needed | Keep visibly wet for the full label contact time | Disinfecting a visibly dirty floor |
| Tile grout | Grout brush with mild cleaner | Rinse and dry fully | Heavy soaking |
| Carpet and rugs | Vacuum first, then carpet-compatible cleaner | Dry per manufacturer instructions | Saturating with hard-floor chemicals |
| Unsealed stone | Stone-safe pH-neutral cleaner, damp mop only | Dry fully; blot spills immediately | Excess water, acidic cleaners |
Why water is the risk on wood and laminate
Flooring-care guidance from Kärcher is direct about parquet and laminate: they're moisture-sensitive, excess water can make them swell or permanently deform, and wood expands and shrinks with humidity. The same guidance says mechanical force should be minimized on wood surfaces.
So the wetter, harder-scrubbing version of your routine usually delivers a worse result than a controlled damp clean. A cloudy gray sheen across an oak plank is finish failure, not leftover dirt, and no amount of extra cleaner brings it back.
Cheap insurance: test a finish before you wet a whole room. Press a damp, not dripping, cloth on an inconspicuous spot for a minute, lift it, wait ten minutes, and look for clouding, whitening, or a seam edge that has lifted. If any of those appear, mop drier and dry behind yourself.
Open seams and plank gaps change the job too. Keep water out of them entirely, use a barely damp mop, and follow with a dry microfiber pass. After a renovation, vacuum the grit before anything gets wet, because abrasive dust under a wet mop acts like sandpaper across a finish.
Grout is a separate problem. When porcelain grout has gone from gray to black and a mild cleaner plus a brush isn't lifting it, when to call a Dublin professional explains how a tile specialist treats grout lines without dulling the glaze.
Vinyl plank is the forgiving material of the group. The practical routine, including what to skip, is covered in this guide to how to clean vinyl plank flooring: no wax, no abrasive scrubs, no undiluted bleach near the seams.
Find your row, read the product label to confirm the material is listed, and treat steam as off-limits on wood and laminate unless the manufacturer explicitly allows it.
Clear the Room and Remove Dust First
A bedroom tells the story better than any other room. The floor looks clean under the ceiling light. Then you run a damp mop along the baseboard and a gray line appears, and you find a second one under the bed frame where the dust has been sitting since the last time anyone moved the storage bins.

What that line shows is a surface holding material between cleanings. In a U.S. Environmental Protection Agency assessment, floor-dust data were reported in micrograms per square centimeter, which is a way of saying hard floors act as reservoirs for contaminants that accumulate between routine passes (EPA indoor dust assessment). That's why dry prep comes first and why a visual pass isn't enough.
- Clear the floor completely. Toys, clothing, papers, and charger cables come off first. Nothing on the floor means nothing to mop around, and mopping around an object leaves a dirty ring you'll see later.
- Move what you can lift. Dining chairs, side tables, floor lamps, and loose rugs go to one side or out of the room. Anything you can't move gets cleaned up to its base, then finished after it's shifted.
- Vacuum before you wet. Work the edges, corners, under the furniture, and the transition strips where one floor meets another, using a vacuum with a HEPA filter. Dust you pull out dry can't turn into mud.
- Take up loose grit after any renovation. Abrasive particles scratch a finish when they're dragged under a wet mop. Sweep or vacuum them dry and check again.
- Inspect under angled light. Put a lamp low to the floor and look across the surface, not down at it. Loose debris shows up plainly at that angle.
Your check before the bucket comes out: no visible dust along the edges, no grit underfoot, and a clear walking path from the farthest corner to the door.
Protect Indoor Air While You Clean
A nine-year-old who uses an inhaler and a dog that sleeps on the bedroom floor change what deep cleaning is for. The parents aren't chasing shine. They want fewer particles in the air their child breathes at night, and that goal sets the sequence.
Cleaning makes the air worse before it makes it better. Every pass of a broom, vacuum, or mop stirs settled dust back into the room, so the job briefly adds to what people breathe before it removes anything. The payoff comes after: an indoor-air study reported airborne dust concentrations 43 to 56 percent lower after deep cleaning and a statistically significant 61 percent reduction in airborne fungi across seven months of improved housekeeping (indoor cleaning and air quality study).
Flooring type changes how dust behaves while you work. Carpet holds particles in the pile and releases them slowly underfoot. A hard floor gives them up faster, especially under a dry broom or a leaky vacuum. The two surfaces release dust differently when they're walked on and cleaned, so neither one gets a pass on the capture-first rule.
Match the sequence to the household:
- Capture before you wet. Particles pulled out through a filtered vacuum or a damp dusting pass can't recirculate. Particles pushed around dry go airborne and re-settle on everything you just cleaned.
- Hit the collectors. Baseboards, the tops of door frames, and HVAC return grilles hold the dust that keeps dropping back onto the floor after you finish.
- Keep people and pets off the floor until it's dry to the touch, especially in the room where the child sleeps. Every footstep on a damp floor kicks a little more back into the air.
- Ventilate after the floor dries, not mid-job. Open windows or run exhaust fans to flush what's still suspended. If sensitivities shape your product choices, this guide to choosing an eco-friendly floor cleaner covers what to look for on the label.
A dry sweep that throws dust back into the room does a different job than a filtered vacuum followed by a damp pass, even when the floor looks identical afterward. For a household managing asthma or allergies, that difference is the whole point.
How to Deep Clean Floors Step by Step
One rule decides the whole routine: clean first, disinfect second. CDC guidance notes that dirt and other impurities reduce a disinfectant's effectiveness, and the EPA's disinfectant guidance treats skipping the pre-clean as a major technical failure point. Disinfectant poured over a greasy film isn't protecting anyone.
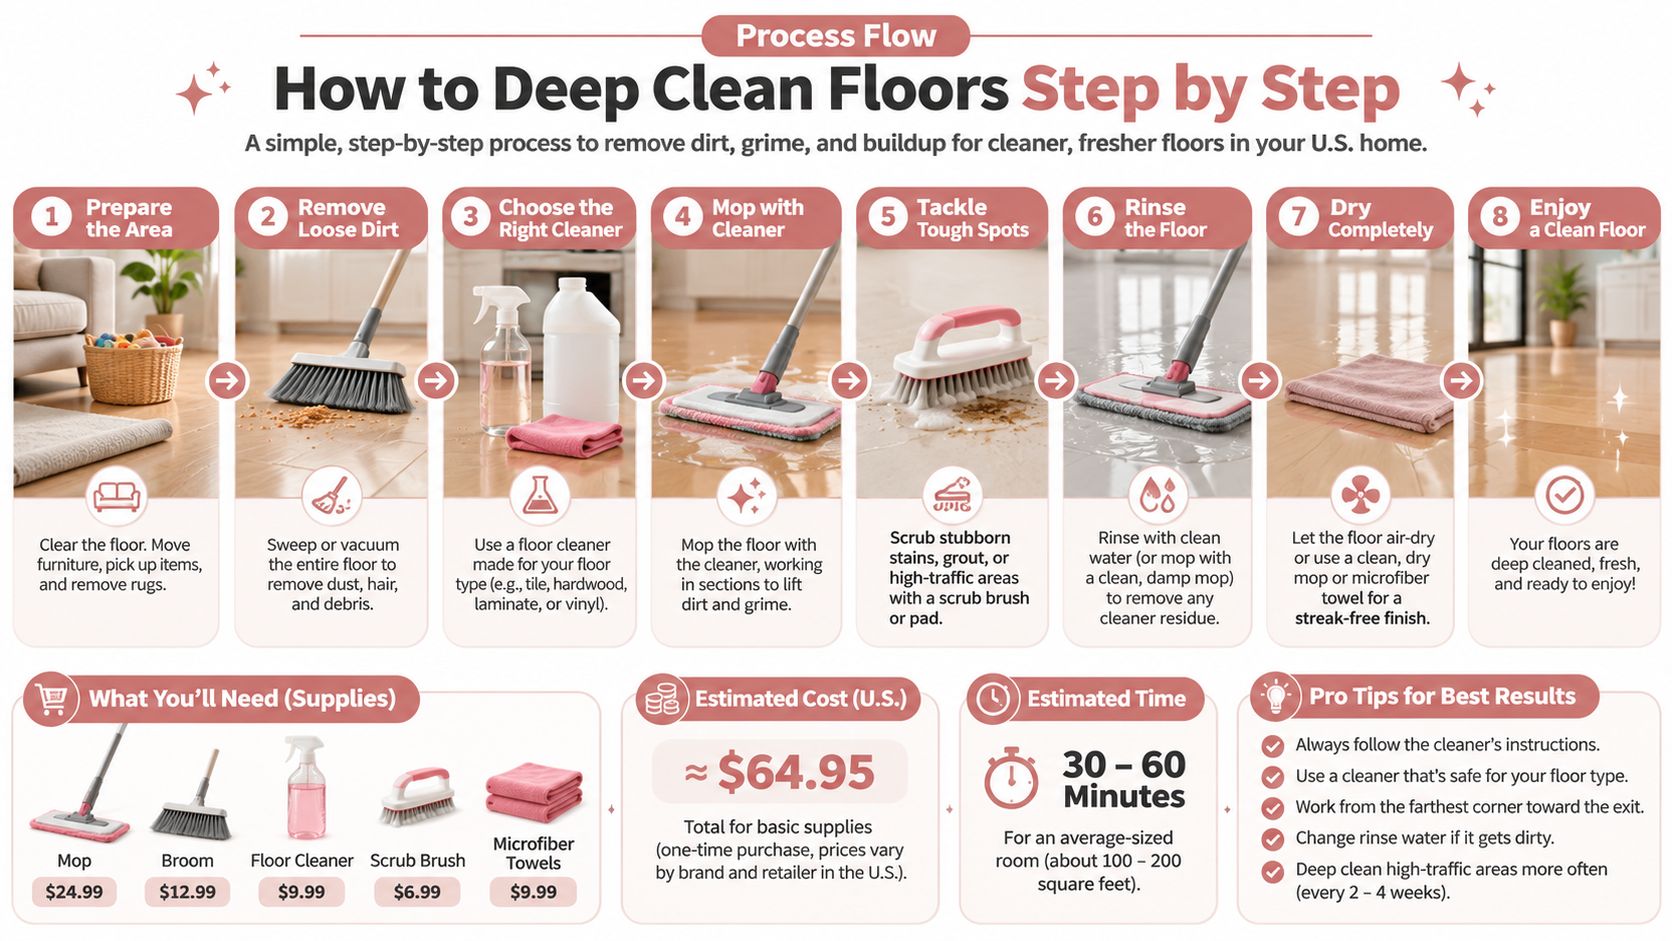
- Mix to the label, not to your instincts. A stronger solution doesn't clean deeper. It leaves film, dulls finishes, and can make the floor slippery. Measure the capful.
- Pre-clean the high-soil zones in a separate pass. Entryways, the strip in front of the stove, pet feeding areas, and grout lines get their own treatment with fresh solution. Don't compensate for soil with concentration.
- Work in sections toward the exit. Split a hallway into three-foot strips and clean from the farthest point back toward the door. You never walk across wet floor and you never track soil back onto a finished strip.
- Change the water before it looks gray. Dirty mop water redeposits everything you just lifted. Swap it, or dump the rinse bucket, at the point where it stops looking clear.
- Disinfect only for a reason, and time it. Illness in the house, raw meat on the floor, a pet accident. Apply an EPA-registered product evenly and keep the surface visibly wet for the full label contact time, which in EPA examples runs from seconds to 10 minutes. If it dries early, reapply rather than assuming it worked.
- Rinse only if the label says so, then let the floor dry and confirm it's dry to the touch before anyone walks on it.
Two rooms, two routines. A carpeted bedroom gets vacuumed first, then cleaned only with a carpet-compatible product and dried exactly as the manufacturer directs. Never pour a hard-floor disinfectant into carpet pile or soak the backing. The ceramic kitchen with dried food on it gets swept, washed with a compatible cleaner, and only then kept visibly wet with a disinfectant for the full label time, and only when illness or raw meat is the reason. For the deeper carpet version of that bedroom job, deep cleaning carpet walks through the pre-treatment order. Sealed hardwood has its own finishing sequence, which how to clean hardwood floors sets out for grain-direction mopping and when refinishing is the only answer.
Four variables control every hard floor: soil removal, label concentration, light mechanical action, and drying. Get those right and the brand of cleaner barely matters.
Common Problems and How to Fix Them
A floor that looks worse after cleaning usually points to residue, moisture, or contact time. Sticky tile, hazy laminate, and hardwood seams that start to lift are different symptoms of the same few mistakes.
Start with three checks before you change anything. Look across the floor under angled light, because streaks hide from overhead lighting. Touch it, and confirm it is dry rather than cool and damp. Then check for sticky film or standing water in the grout lines and along the toe kick.
Many problem floors trace back to four failures: edges that never got cleaned, mop water reused until it was contaminated, too much moisture on a vulnerable material, and treating cleaning and disinfecting as the same step. Keep air moving while the floor dries so humidity does not sit over a damp surface.
| Symptom | Likely cause | Fix |
|---|---|---|
| Sticky film after mopping | Too much cleaner or overconcentration | Rinse with clean water and let dry; follow label dilution |
| Dull or hazy finish | Residue left behind or wrong product | Rinse with clean water; switch to a neutral cleaner |
| Cupping, swelling or seam gaps | Excess moisture on wood or laminate | Stop wet cleaning and dry the area; get a professional opinion if it persists |
| Dirt returns quickly | Dirty mop water or skipped edges | Change water and clean edges first |
| Floor dries before disinfectant time ends | Too little product or fast drying | Reapply to keep the surface visibly wet for the full contact time |
| Streaks under angled light | Too much solution or dirty rinse water | Use less solution and rinse with clean water |
Stop rule: if a wood or laminate floor swells, cups, goes hazy, or loses sealant, stop wet cleaning immediately. Dry the area with airflow, keep water off it, and get a professional opinion before you try another product on top of the problem.
Concrete fixes beat new products. Rinse with clean water, use less solution, change the water more often, and reapply disinfectant to hold the surface wet for the full contact time. If the finish on sealed hardwood is already damaged, use these hardwood floor cleaning methods to decide what is safe to try next and what needs a refinisher.
Decide Whether to Book a Professional Deep Clean
Square footage matters less than variety and risk. Clean it yourself when the home has one floor material, a modest area, and no disinfection requirement. Book help when several materials share the same house, when sealed or engineered wood leaves you guessing about safe moisture levels, when post-renovation grit is everywhere, or when someone in the home has allergies or respiratory sensitivity and you need dust and fumes controlled while you work.
Two realistic cases. A three-bedroom home with hardwood downstairs, tile in the bathrooms, and carpet in the bedrooms, cleaned before a family gathering, is a multi-material job with three different drying rules. A landlord preparing a move-out across several units faces the same problem multiplied by every floor type in the building.
Whatever you choose, do this first: list each floor type and the rooms it covers, note children and pets, flag which floors need disinfection and why, then follow the method for each material. Aquastar Cleaning Services provides deep cleaning for houses, apartments, and condos, customizes the plan to the home's condition, and offers a free cleaning estimate from a professional, trained, and insured team. The crew does not move furniture heavier than 25 lbs, and clients pick up toys, clothing, and papers beforehand so the team can focus on cleaning surfaces. You can review deep cleaning services before you decide.
Price the choice carefully. In the 2024 Cleanfax Carpet and Floor Cleaning Benchmarking Survey, 33% of respondents reported charging at least $1 per square foot for residential hard-floor cleaning (Cleanfax industry survey), so a 200-square-foot kitchen runs about $200 at that rate before multiple materials, wood risk, or renovation grit push the job toward a professional. Where finish wear goes past what cleaning can fix, floor deep for Denver homes shows what a wood-specific deep clean involves. Compare that with a weekend of DIY on one small, single-material floor that needs no disinfection.
When the floors in your Kennesaw or North Atlanta home need more than a quick mop, Aquastar Cleaning Services, LLC handles the whole job: sweeping and mopping hard surfaces, vacuuming carpets and rugs, and detailed work on baseboards and trim. Every deep clean starts with a free estimate and a plan built around your floor types and your household's pets and clutter level. Visit Aquastar Cleaning Services, LLC to request your estimate and pick a date.